WhatsApp Integration
This blog is intended for people developing WhatsApp messaging integration for themselves or their organization. All developers must follow WhatsApp’s Commerce Policy.
Send Your First WhatsApp Message Using a Test Number in 2 Steps
Now it’s very easy to integrate WhatsApp into your application and we can send messages using WhatsApp. Just follow the above steps.
- Set up developer assets and platform access
- Send a test message
1. Set up Developer Assets and Platform Access
The WhatsApp Cloud API and WhatsApp Business Management API are part of Meta’s Graph API, so you need to set up a Meta developer account and a Meta developer app. To set that up:
- Register as a Meta Developer
- Enable two-factor authentication for your account
- eta App: Go to developers.facebook.com > My Apps > Create App. Select the "Business" type and follow the prompts on your screen.
From the App Dashboard, click on the app you would like to connect to WhatsApp. Scroll down to find the "WhatsApp" product and click Set up.
Next, you will see the option to select an existing Business Manager (if you have one) or, if you would like, the onboarding process can create one automatically for you (you can customize your business later if needed).
Make a selection and click Continue. This will:
- Associate your app with the Business Manager account that you selected earlier (or had created for you).
- Generate a WhatsApp Business account.
- Generate a test business phone number and associate it with your WhatsApp Business Account. You can use this number with the API to send an unlimited number of messages to up to 5 recipient phone numbers. Recipient phone numbers can be any valid number, but you must verify each one in the next step.
- Redirect you to the WhatsApp > Getting Started (or Setup) panel in the App Dashboard.
2. Send a Test Message
In the WhatsApp > Getting Started (or Setup) panel:
- Select your test phone number in the From field.
- Enter the recipient phone number you would like to message in the To field. Ensure the number is correct, and that you want to add it to your list of 5 possible message recipients —as you add phone numbers, follow the prompts on the screen to verify you have access to them. Once this number has been added, it cannot be removed from your list. Note: This limitation is only for WhatsApp-provided test phone numbers. Real phone numbers that you register do not have a limit on the number of recipients.
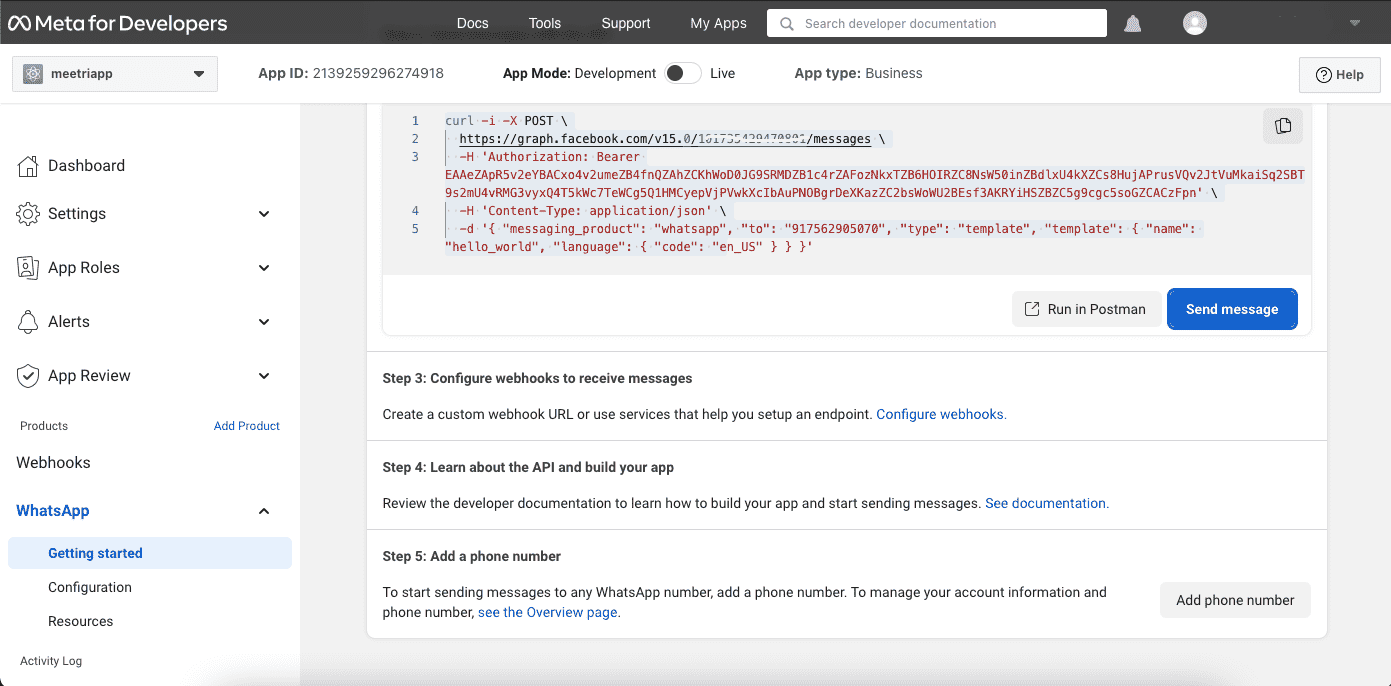
- Once you enter a recipient phone number, the code sample on the page will be updated to demonstrate an API call that sends a pre-approved message template to that number. Message templates are the only type of message that can be sent to customers who have yet to message you, or have not messaged you in the last 24 hours. Thus, message templates are primarily used to initiate conversations with customers.
- The updated code sample will look something like this:
- Finally, click Send a message to send the first message. As an alternative, you can copy the code sample provided and execute it in your Terminal or Postman. You have to just send a test message!
              https://graph.facebook.com/v15.0/101735429470801/messages \

              -H 'Authorization: Bearer EAAeZApR5v2eYBACxo4v2umeZB4fnQZAhZCKhWoD0JG9SRMDZB1c4rZAFozNkxTZB6HOIRZC8NsW50inZBdlxU4kXZCs8HujAPrusVQv2JtVuMkaiSq2SBT9s2mU4vRMG3vyxQ4T5kWc7TeWCg5Q1HMCyepVjPVwk........' \

              -H 'Content-Type: application/json' \

              -d '{ "messaging_product": "whatsapp", "to": "91756290xxxxx", "type": "template", "template": { "name": "hello_world", "language": { "code": "en_US" } } }'
Screenshots of the demo app named ‘meetriapp’:
Conclusion
Now it’s very easy to integrate WhatsApp into your application and we can send messages using WhatsApp. Just follow the above steps.
Read more blogs here